Other sections
HDX placement BETA

The HDX user guide is in three parts. This second section outlines key placement guidelines for all configurations. To find the HDX system that’s right for you, use the Nureva® product selector or refer to Choose your HDX configuration in this guide.
Placement principles
- Maintain a clear path— Audio bars and microphone pods perform best when they have a clear, unobstructed view of each other and the room.
- Avoid obstacles — Avoid placing components behind pillars, inside alcoves or in recessed areas.
- Stay clear of noise sources — Position components away from HVAC vents, fans and other equipment that produces continuous background noise.
.jpg?width=400&height=215&name=Line%20of%20sight%20%E2%80%93%20good%20(2).jpg "Line of sight – good (2)")
Unobstructed path
.jpg?width=400&height=215&name=Line%20of%20sight%20%E2%80%93%20bad%20(1).jpg "Line of sight – bad (1)")
Obstructed path
Audio bar placement
Audio bars can be mounted vertically or horizontally on the wall using the mounting bracket provided in the box. They can also be installed using VESA® standard mounting solutions, including display mounts, floor stands and mobile carts for added flexibility.
To determine the ideal placement location, first consider whether the space has a defined front of room.
Front of room
The front of the room is the natural focal point, where presenters typically stand and audience attention is directed. This may be either a long wall or a short wall. Ideally, for rooms with a defined front position, place two audio bars of any system along this wall, evenly distributed, as shown below.
2 audio bars — room layouts
Rooms with a front of room
- Place the two audio bars on the front wall.
- Position them evenly along the wall, near the ¼ and ¾ points.
- Installing each audio bar within 4' (1.2 m) either side of the ¼ and ¾ points provides optimal performance. However, audio bars installed outside this range will still function.
This layout provides balanced audio support for both presenters and participants.

Two-bar system with a long front of room
Two audio bars on the wall at the front of the room.

Two-bar system with a short front of room
Two audio bars on the wall at the front of the room.

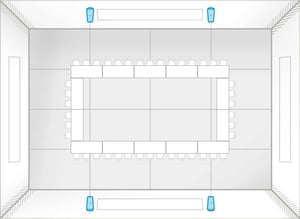
Two-bar system: No front wall
Place the two audio bars on the same long wall.
Rooms without a front
In collaborative and multipurpose spaces without a clear front:- Place the two audio bars on the same long wall.
- Position them evenly along the wall, near the ¼ and ¾ points.
- Installing each audio bar within 4' (1.2 m) either side of the ¼ and ¾ points provides optimal performance. However, audio bars installed outside this range will still function.
Following these guidelines will help provide consistent coverage regardless of where people are seated or speaking.
4 audio bars — room layouts
Use a balanced, symmetrical layout to provide consistent coverage across the room.
Select the layout that best takes into account the room constraints.
Rooms with a front of room

Four-bar system, all walls available (ideal)
Two audio bars on the front wall. One additional audio bar on each side wall, positioned approximately ¾ of the distance toward the back of the room.

Four-bar system, side walls not available
Two audio bars on the front wall and two audio bars on the back wall at approximately the ¼ and ¾ points.

Four-bar system, no front wall mounting available
Two audio bars on each side wall, positioned at approximately the ¼ and ¾ points on the side walls.

Four-bar system, front wall mounting not available and side walls at back of room not available
One audio bar on each side wall at approximately the ¼ point, measured from the front. Two audio bars on the rear wall at approximately the ¼ and ¾ points.

Four-bar system: No front wall
Place two audio bars on each long wall.
Rooms without a front
In collaborative and multipurpose spaces without a clear front:
- Place two audio bars on the same long wall.
- Position them evenly along the wall, near the ¼ and ¾ points.
- Installing each audio bar within 4' (1.2 m) either side of the ¼ and ¾ points provides optimal performance. However, audio bars installed outside this range will still function.
- Place the next two audio bars in the same way on the opposite wall.
Following these guidelines will help provide consistent coverage regardless of where people are seated or speaking.
Audio bar orientation
HDX audio bars can be mounted vertically or horizontally.
- Vertical orientation (default) — Microphones are positioned on the upper half of the audio bar, separated from the speakers on the lower half, providing improved localization and clarity.
- Horizontal orientation — The speaker drivers (located near the Nureva logo) need to be positioned toward the outer edges of the room for even sound distribution.
Audio bar: Microphone and speaker locations

Vertical placement

Horizontal placement


Correct horizontal installation
Nureva logos face outer edges of room

Incorrect horizontal installation
One Nureva logo faces center of room
Audio bar best practices
- Symmetry — Strive for symmetrical placement to maintain balanced sound.
- Mounting height — Mount the audio bars at or above head level.
- Orientation — Consider that both vertical and horizontal mounting orientations are supported:
- Vertical mounting offers optimal speaker dispersion.
- Horizontal mounting works well around windows and whiteboards.
- Tiered rooms — Mount the audio bars at a consistent height, following the slope of the floor.
- Irregular-shaped rooms — Try to position the audio bars in a rectangular or square layout aligned with the main seating area.
- Adaptive Voice Amplification (requires external microphone) — Avoid placing the audio bars close to podiums and presentation areas where an external microphone will be used, as this can cause double pickup and audio feedback.
Audio bar mounting guidelines

| Guideline | Measurement | Why this helps |
| Suggested height from floor | 3' (91 cm) to 12' (366 cm) | Audio bars being placed at or above head level will help direct sound toward listeners and improve microphone pickup across the room. Maintain a minimum clearance of 3" (8 cm) above the audio bars for wall-mount installation and serviceability. |
| Minimum distance from adjacent wall or corner | 1' (30 cm) | Avoid placing audio bars on walls close to corners. If corner placement is required, angle the audio bars to face into the room using a VESA standard mounting solution. |
| Minimum spacing between audio bars | 5' (152 cm) | Adequate space between the audio bar speakers helps prevent them from playing directly into other components, reducing echo and supporting consistent performance. |
Microphone pod placement
One or two microphone pods may be mounted on the ceiling, wall or VESA standard structures, depending on the room layout, furniture arrangement and primary talker locations.
The suggested layouts below illustrate placement strategies, not fixed requirements. Microphone positioning is highly flexible, and these examples are intended to explain how to place microphone pods for additional pickup, depending on the use case.
1 microphone pod — room layouts

Extended pickup
Position microphone pod toward the back of the room. (Two-bar system.)

Front pickup
Position microphone pod near the front for presenter voice pickup.

Even pickup
Center microphone pod in the room to ensure even pickup.
2 microphone pods — room layouts

Long front of room
Position microphone pods on the ceiling at around the ⅓ and ⅔ positions across the long length of the room.

Short front of room
Position microphone pods on the ceiling at around the ⅓ and ⅔ positions across the long length of the room.
Microphone pod orientation
HDX microphone pods can be mounted in almost any orientation, except upside down on a wall, using the supplied mounting bracket. In an upside-down orientation, the microphone pod will not securely attach to the bracket.

Presenter or podium positioning
When a room has a podium or the primary talker location is predefined, install the microphone pod on the wall or ceiling facing that location. Ideally, position the microphone pod between 3' and 10' (0.9 and 3.0 m) from the primary talker’s location.

Microphone pod mounted on the wall or ceiling in front of the primary talker location.

Position microphone pods between 3' (0.9 m) and 10' (3.0 m) from the primary talker’s location.
Microphone pod best practices
- Physical proximity — Position the microphone pods near primary talker areas.
- Even coverage — Space microphone pods evenly for balanced microphone pickup.
- Mounting height — Mount microphone pods above head level whenever possible.
- Away from noise — Keep microphone pods away from HVAC vents and other persistent noise sources.
- Two microphone pods — Extend coverage or enable Adaptive Voice Lift with two microphone pods.
Microphone pod mounting guidelines
Recommended microphone pod placement guidelines for optimal audio performance.
Ceiling mounted

Wall mounted

| Guideline | Measurement | Why this helps |
|---|---|---|
| Typical ceiling-mounted height | 8' to 12' (244 to 366 cm) | The coverage and sensitivity of the microphone pod are balanced, helping capture voices clearly from all seating positions. |
| Minimum wall-mounted height | 3' (91 cm) | The placement of microphone pods above seated head height helps maintain clear pickup while minimizing obstruction from furniture and people. |
| Minimum spacing from audio bars | 5' (152 cm) | Adequate spacing between microphone pods and audio bars helps ensure the speakers and microphones are not facing directly toward each other, reducing echo and supporting features like Adaptive Voice Amplification and Adaptive Voice Lift. |
System hub placement
The HDX system hub can be placed on a table, shelf or rack, or it can be mounted on the wall. Regardless of placement, ensure adequate ventilation and an unobstructed Bluetooth® wireless connection.
Clearances and ventilation
Tabletop clearances

Rack clearances

Wall-mount clearances

Ventilation areas must remain open

System hub placement guidelines
- Ventilation — Ensure all ventilation openings remain unobstructed.
- Side ventilation: Allow at least 2.2" (56 mm) of clearance.
- Top ventilation: Allow at least 3.40" (86 mm) of clearance above.
- Heat considerations — Do not install the system hub near other devices that generate heat. Surrounding temperature must remain below 40 °C (104 °F).
- Bluetooth antenna
- Orientation — Position the Bluetooth antenna upright for optimal signal strength.
- Extensions — Note that Bluetooth antenna extenders are not recommended. Use at your own risk.
- Password and enrollment code (XXX-XXX-XXX) — Record the code that’s on the bottom of the system hub. This code is required to connect the device to the Nureva App and enroll it in Nureva Console.
- Network requirements — Confirm network requirements to support updates and Nureva cloud services.
Specific room types
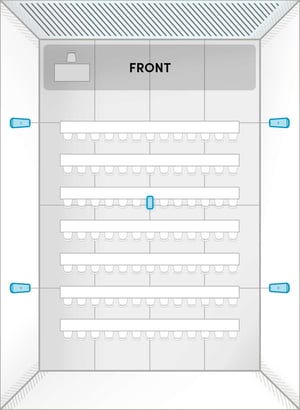
Tiered rooms
When placing HDX audio bars and microphone pods in tiered rooms, keep them at consistent heights relative to each tier, following the slope of the floor.
Examples of consistent slope installation with 4 audio bars — tiered room layouts.

Two audio bars on each long wall for optimal pickup.

Two audio bars at the front of room and one audio bar on each of the two long walls.
Best for use with Adaptive Voice Amplification.
Irregular-shaped rooms
For rooms with non-rectangular layouts:
- Visualize the room as a rectangle.
- Apply standard placement guidance for all components.
- Focus on symmetry, clear sound paths and even coverage.
The images below show examples of two-bar and four-bar placements in irregular-shaped rooms, helping to visualize the rectangular placement approach.
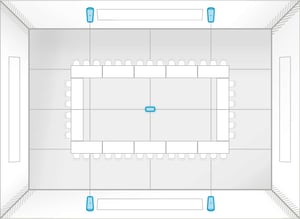
2 audio bars — irregular-shaped layouts


4 audio bars — irregular-shaped layouts


For additional guidance specific to your room or unique installation requirements and placement recommendations, contact Nureva Support.
Subwoofer placement (optional)
Subwoofers enhance low-frequency response and should be placed thoughtfully to avoid excessive bass buildup. Here are some guidelines:
- Maintain a clear line of sight from the subwoofer to the listening area.
- Avoid placing subwoofers directly against walls or in corners.
- Ensure easy access for cable connections and tuning adjustments.
Refer to your subwoofer’s manual for product‑specific placement guidance, as this section provides general recommendations only.
Subwoofer placement examples

One subwoofer
Place at the front center between the two audio bars.

Two subwoofers
Position them diagonally in opposite corners or near the quarter points of the room facing in.
Adaptive Voice Amplification placement
Adaptive Voice Amplification enhances the audibility of presenters in larger spaces. Here are some guidelines:
- Note an external microphone needs to be connected to the HDX system (up to four may be used).
- Position the audio bars so the speakers face the audience.
- Avoid placing the audio bars too close to fixed podiums to prevent feedback.

Audio bar placement recommended for Adaptive Voice Amplification
Audio bars are positioned behind the podium area.

Audio bar placement NOT recommended for Adaptive Voice Amplification
Audio bars are positioned too close to the podium, where an external microphone is in use.
Room layouts
Examples of room layouts are shown for each HDX configuration.

HDX 2 bar: room layouts
This setup is ideal for high-impact Teams Rooms, Zoom Rooms and other meeting or collaboration spaces up to 30' x 30' (9.1 x 9.1 m).
 HDX 2 bar: room layouts
This setup is ideal for high-impact Teams Rooms, Zoom Rooms and other meeting or collaboration spaces up to 30' x 30' (9.1 x 9.1 m).
 |
Room size: Up to 30' × 30' (9.1 × 9.1 m) Features available: Adaptive Voice Amplification for instructors or presenters |
 |
Room size: Up to 30' × 30' (9.1 × 9.1 m) Features available: Adaptive Voice Amplification for instructors or presenters |
 |
Room size: Up to 30' × 30' (9.1 × 9.1 m) Features available: Adaptive Voice Amplification for instructors or presenters |
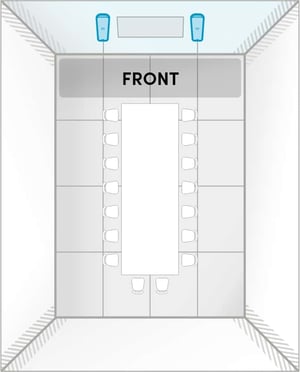
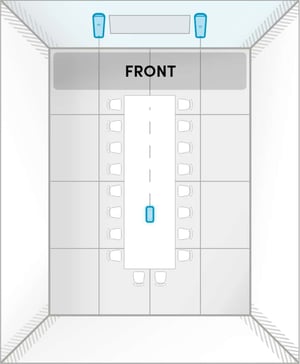
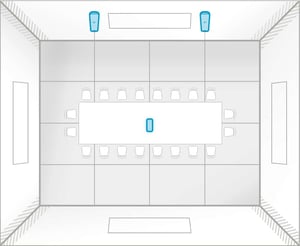
HDX 2 bar: A
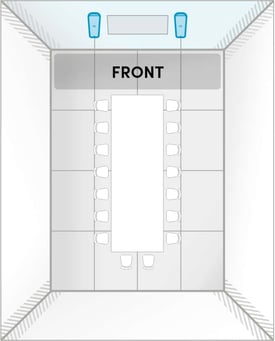 |
Room size: Up to 30' x 30' (9.1 x 9.1 m) |
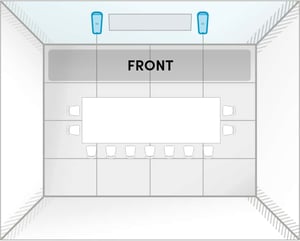
HDX 2 bar: B
|
Room size: Up to 30' x 30' (9.1 x 9.1 m) |
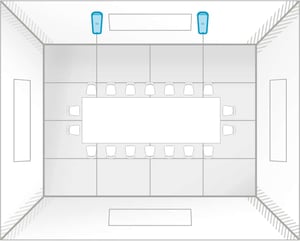
HDX 2 bar: C
|
Room size: Up to 30' x 30' (9.1 x 9.1 m) |

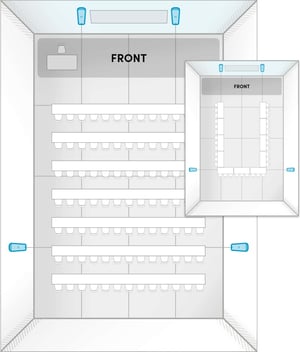
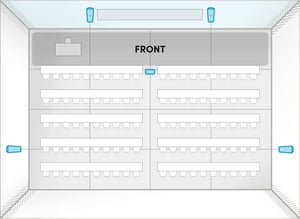
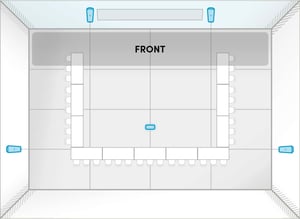
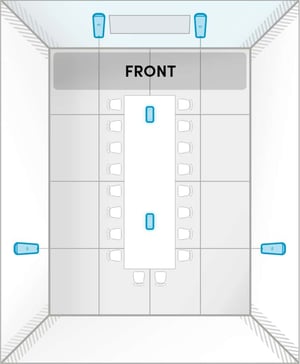
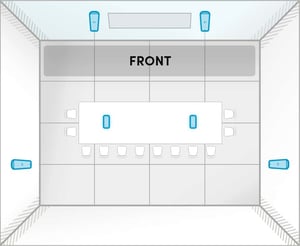
HDX 2 bar + 1 pod: room layouts
This setup is ideal for multipurpose spaces up to 35' x 40' (10.7 x 12.2 m). You can combine two of these system configurations to create a divisible room with built-in switching — no need to purchase extra components.
HDX 2 bar + 1 pod: A
 |
Audio bars are positioned for ideal speaker output. Microphone pod is positioned to ensure everyone at the back of the room can be heard. Room size: Up to 35' x 40' (10.7 x 12.2 m) |
HDX 2 bar + 1 pod: B
 |
Microphone pickup at the front is prioritized over the speaker output to provide clear speech pickup of an instructor facing the audience. Speaker coverage may be reduced at the back of the room. Room size: Up to 35' x 40' (10.7 x 12.2 m) |
HDX 2 bar + 1 pod: C
 |
Horizontal placement of audio bars may reduce sound dispersion and clarity of speakers. This layout is ideal for classrooms where there is limited space for vertical installation. Room size: Up to 35' x 40' (10.7 x 12.2 m) |
HDX 2 bar + 1 pod: D
 |
Audio bars are positioned for ideal speaker output. Microphone pod is positioned to ensure everyone at the back of the room can be heard. Room size: Up to 35' x 40' (10.7 x 12.2 m) |
HDX 2 bar + 1 pod: E
 |
Audio bars are positioned for ideal speaker output. Microphone pod is positioned to ensure everyone throughout the room can be heard. Room size: Up to 35' x 40' (10.7 x 12.2 m) |

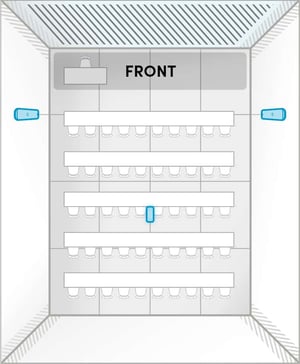
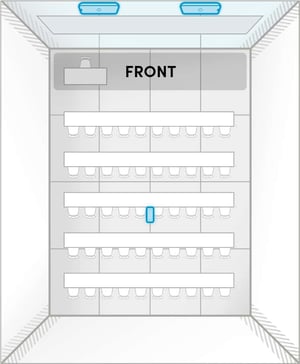
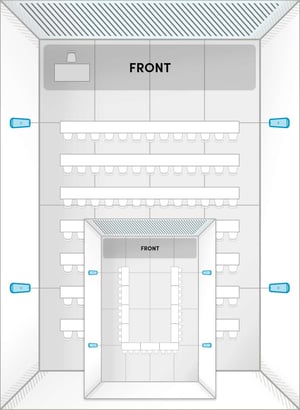
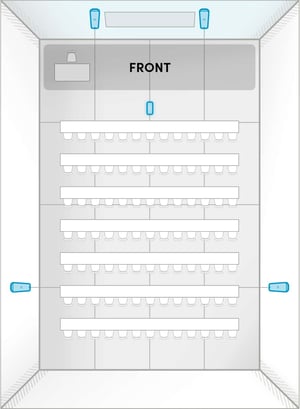
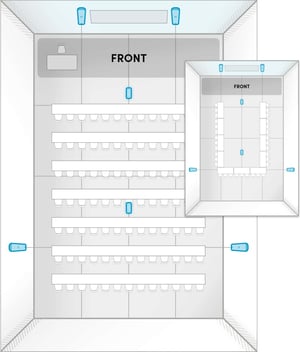
HDX 4 bar: room layouts
This setup is ideal for meeting and learning spaces up to 40' x 60' (12.2 x 18.3 m).
HDX 4 bar: A
 |
Audio bars are positioned for full-room speaker output and even full-room microphone pickup. Room size: Up to 40' x 60' (12.2 x 18.3 m) |
HDX 4 bar: B
 |
Audio bars are positioned to prioritize microphone pickup for instructors or presenters speaking to an audience. Room size: Up to 40' x 60' (12.2 x 18.3 m) |
HDX 4 bar: C
 |
The long walls in this room may be unsuitable for installation. Audio bars are positioned for optimal speaker output. Consider adding a microphone pod to ensure microphone pickup at the back of room is clear. Room size: Up to 40' x 60' (12.2 x 18.3 m) |
HDX 4 bar: D
 |
Audio bars are positioned for full-room speaker output and balanced full-room microphone pickup. Room size: Up to 40' x 60' (12.2 x 18.3 m) |
HDX 4 bar: E
 |
Audio bars are placed on the long walls for optimal dispersion in the room. Room size: Up to 40' x 60' (12.2 x 18.3 m) |

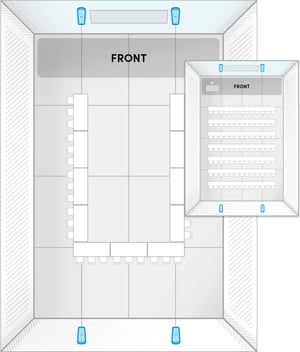
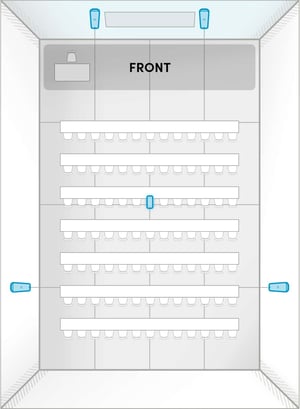
HDX 4 bar + 1 pod: room layouts
This setup is ideal for enhanced microphone pickup in lecture halls and training rooms up to 40' x 60' (12.2 x 18.3 m).
HDX 4 bar + 1 pod: A
 |
Audio bars are positioned for full-room speaker output and even microphone pickup. The microphone pod is positioned to pick up the voices of instructors or presenters speaking to an audience. If a podium is being used, position the pod closer to the podium on the wall or ceiling. Room size: Up to 40' x 60' (12.2 x 18.3 m) |
HDX 4 bar + 1 pod: B
 |
Audio bars are positioned for full-room speaker output and even microphone pickup. The microphone pod is positioned to pick up voices in the audience. Room size: Up to 40' x 60' (12.2 x 18.3 m) |
HDX 4 bar + 1 pod: C
 |
Audio bars are positioned to prioritize microphone pickup for the voices of instructors or presenters speaking to an audience. The microphone pod is positioned to pick up voices in the audience. Room size: Up to 40' x 60' (12.2 x 18.3 m) |
HDX 4 bar + 1 pod: D
 |
The long walls in this room may be unsuitable for installation. Audio bars are positioned for optimal speaker output, but back wall microphones may be behind talkers in the room. The microphone pod is positioned to pick up the voices of participants at the back of the room. Room size: Up to 40' x 60' (12.2 x 18.3 m) |
HDX 4 bar + 1 pod: E
 |
Audio bars are positioned for full-room speaker output and even full-room microphone pickup. The microphone pod is positioned to pick up the voices of instructors or presenters speaking to an audience. If a podium is used often, position the microphone pod closer to the podium, on the ceiling or wall. Room size: Up to 40' x 60' (12.2 x 18.3 m) |
HDX 4 bar + 1 pod: F
 |
Audio bars are positioned for full-room speaker output and even microphone pickup. The microphone pod is positioned to pick up the voices of participants at the back of the room. Room size: Up to 40' x 60' (12.2 x 18.3 m) |
HDX 4 bar + 1 pod: G
 |
Audio bars are placed on the long walls for even coverage. With no defined front of room, the microphone pod is positioned at the room’s center. Room size: Up to 40' x 60' (12.2 x 18.3 m) |

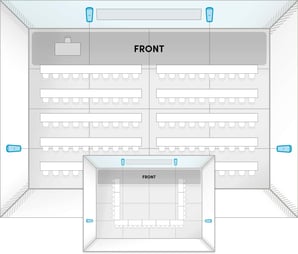
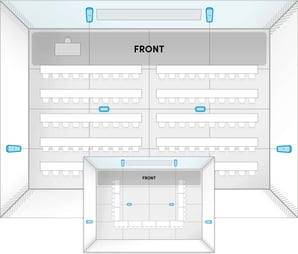
HDX 4 bar + 2 pod: room layouts
This setup is ideal for high-impact learning and meeting spaces up to 40' x 60' (12.2 x 18.3 m) that require voice lift everywhere.
HDX 4 bar + 2 pod: A
 |
Audio bars are positioned for full-room speaker output and even microphone pickup. The microphone pods are positioned to pick up the voices of instructors or presenters speaking to an audience as well as voices in the audience at the back. Room size: Up to 35' x 40' (10.7 x 12.2 m) Note: This same configuration is shown in a larger room in HDX 4 bar + 2 pod: C. |
HDX 4 bar + 2 pod: B
 |
Audio bars are positioned for full-room speaker output and even microphone pickup. The microphone pods are positioned to pick up the voices of participants in the center of the room. Room size: Up to 35' x 40' (10.7 x 12.2 m) Note: This same configuration is shown in a larger room in HDX 4 bar + 2 pod: E. |
HDX 4 bar + 2 pod: C
 |
Audio bars are positioned for full-room speaker output and even microphone pickup. The microphone pods are positioned to pick up the voices of instructors or presenters and voices in the audience. If a podium is being used, position one of the microphone pods closer to the podium, on the ceiling or wall. Room size: Up to 40' x 60' (12.2 x 18.3 m) Note: This same configuration is shown in a smaller room in HDX 4 bar + 2 pod: A. |
HDX 4 bar + 2 pod: D
 |
The long walls in this room may be unsuitable for installation. Audio bars are positioned for optimal speaker output, but some microphones may be behind talkers. The microphone pods are distributed along the center of the room to pick up voices of participants. Room size: Up to 40' x 60' (12.2 x 18.3 m) |
HDX 4 bar + 2 pod: E
 |
Audio bars are positioned for full-room speaker output and even microphone pickup. The microphone pods are positioned to pick up voices of participants throughout the center of the room. Room size: Up to 40' x 60' (12.2 x 18.3 m) Note: This same configuration is shown in a smaller room in HDX 4 bar + 2 pod: B. |
HDX 4 bar + 2 pod: F
 |
Audio bars are placed on the long walls for even coverage. With no defined front of room, the microphone pods are distributed along the room’s center. Room size: Up to 40' x 60' (12.2 x 18.3 m) |